Archive

Uncategorized

There is always a good debate going on about how one should attach their pride and joy to their vehicles. I’ve spent a bit of time sifting through the different ideas and I think that what I’ve done is the best that suits our vehicle. I made up two straps which are attached to the two rear bolts on the front guards. The back strap goes through the two stainless tie downs in the back of the car.

The last coat of varnish is dry. The varnishing went relatively easy. I really took my time to try and get the coats even and made sure I did everything in according to the varnish (International)  manafacturers instructions. Drying times are critical. I think the main thing is to be patient and just take the time to do it right. The result is great. The paddles are also finished but I think we’ll have to use them first before we make any decisions.

Doing the final sand is a case of looking for anything you’re not happy with and giving it a bit of fine tuning. Then comes the cleaning down. I wiped down with water first to get rid of the dust and then scrubbed the whole hull down, inside and out, with soapy water and a scotchbite. I then washed everthing down again with clean water. Next came the first coat of varnish.

Building the actual canoe doesn’t take that long really but the amount of fiddling around and sanding in between, does

It’s deffinitely a labour of love. I have glued the seats and inspection ports in place and then had a good look around the hull for anything that needs touching up.

I spent three hours of frustration marking and then glueing the wooden plates at the end of the seats. It would have to be the most difficult part of the build. I’ve put these in to lift the seats after getting some feedback about the seat heights. Now it is time to make the seats.

This is one of the jobs that I was really looking forward to. I armed myself with the frames, some webbing, stapler, stainless steel staples, a hot knife to cut the webbing and a hammer to drive some of the staples home. I also used one of those work mates with the plastic stops which gave me something to pull against to tension the webbing.

To make the seats for the canoe I had to buy a “hot knife” to cut the material. This came in a set with branding tools used for burning designs on wood. It gave me the idea for doing something a bit different on the decks.

I love Australian Aboriginal art so the fore deck went with this theme. My wife picked the name Flatdog for the canoe. Flatdog is the name used by some in Northern Australia for a crocodile. The aft deck I did with a real Australian theme. The cross with the stars represents the Southern Cross star constellation. The southern cross flag was flown at the Eureka stockade in Ballarat, Victoria in 1854. This was the emblem chosen by the miners when they rebelled against the government over mining licenses.


I had looked at previous builds and each builder had built the decks in in a different way. Some had built them in before glueing on the gunwales which makes them easier to mark out but harder to hold them down when glueing them in place. They did this using packing tape. I didn’t like this idea.

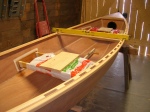
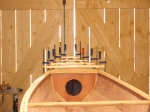
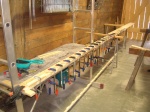
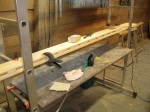
I marked the decks before I glued on the gunwales. When I dry fitted the gunwales I put in a couple of spreaders from the side deck supports to middle support to hold the curve of the hull. Using a sheet of cardboard I marked a template of the deck. After marking and cutting, out It took a bit of fine tuning with the belt sander and trial fitting to get the decks to the right shape. This is the down side of fitting the decks after the gunwales are glued on but with patience it works. With the gunwales on it also gives a stable place to clamp to.

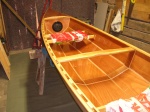
I think I dry fitted the aft deck six times before I actually glued it in place. Well, it’s better to be sure.

Glueing on the gunwales was quite a tricky process especially as I did it by myself. To hold on to a 5m length of wood, covered in a epoxy glue mix and to try and get the first two or three clamps in place is quite a juggling act. I would advise anyone doing this to get someone to help them.

Before glueing it is best to “dry fit” eveything and mark the middle points on the wales so that you have a point to line up to. I also put a strip of masking tape underneath which really helped keep everything a bit cleaner. With the gunwales it would be quite easy to get epoxy everywhere and leave a lot of cleaning up. It’s also important to have enough clamps. I had to use the clamps from my belt sander as well.The inwales in comparison were relatively easy. After glueing in the inwales I then glued on the deck ends. The end result looks great.

The inwales in the plan are made from a 12mm x 25mm length of wood with 50mm spacers glued between the wood length and the top panel or sheer. Thinking that I’d do something really different I’d decided to use the router table that I’d specially built for this purpose and take a 24mm wide length of wood and machine the the gaps between the spacers.  I abandoned the idea after the first two. The router bit wanted to grab the wood and after launching one piece the length of the garage I decided that I’d keep my fingers and go with the plans. The blocks are glued on with epoxy and then I sanded off the epoxy runs and cleaned up in between the spacers. It’s best to epoxy in between the spacers before they are glued on. I then rounded the edges using a spokeshave and sandpaper. Now they’re ready to be glued on the canoe.

When I epoxied the outside of the hull I had a problem with air bubbles under the glass mat. Rather than play around in wet epoxy I let it dry first and then using a wood drill bit, which have a very sharp point, I punched holes through the glass mat and then sanded the areas and gave them a couple of coats of epoxy. I still had to give the top panel two coats so at the finish I gave the whole hull another coat. As I was mixing epoxy I gave the seat frames, center spreader and one side of the paddle blades their two coats.